
When it comes to terrazzo grouting, the process may seem daunting at first, but with the right guidance, it can be a straightforward task that yields impressive results. By breaking down the steps into preparation, application, and maintenance, you'll be equipped with the essential knowledge to achieve a flawless finish. So, let's start by exploring the first crucial step in this 3-step guide to mastering terrazzo grouting.
Key Takeaways
Contents
- Choose the right grout type and color for terrazzo chips.
- Mix grout to a peanut butter consistency for best results.
- Apply grout evenly using a rubber grout float.
- Clean excess grout with a damp sponge at a 45-degree angle.
- Seal grout lines with a specific terrazzo grout sealer.
Surface Preparation
When preparing the surface for terrazzo grouting, the importance of thorough cleaning can't be overstated.
Begin by sweeping the surface to remove any loose debris and dust. Follow this by mopping the area with a neutral pH cleaner to eliminate any remaining dirt, grease, or residues. Rinse the surface thoroughly and allow it to dry completely before proceeding.
Next, inspect the surface for any cracks, holes, or imperfections.
Use a suitable patching compound to fill in these areas and ensure a smooth, level surface for the grout application. Sand down any rough spots or high points to achieve a uniform finish.
Lastly, consider applying a primer to the surface before grouting.
This will help improve adhesion and ensure a strong bond between the terrazzo and the grout. Be sure to follow the manufacturer's instructions when selecting and applying the primer to achieve optimal results.
Choosing the Right Grout
To ensure a successful terrazzo grouting project, selecting the right grout is essential.
The first consideration when choosing grout is the size of the terrazzo chips. For smaller chips, go for a fine grout, while larger chips will require a coarser grout to fill the gaps effectively.
Next, assess the color options available. Opt for a grout color that complements the terrazzo chips and enhances the overall aesthetic appeal.
Additionally, consider the type of terrazzo installation; epoxy grout works best for polished terrazzo to prevent staining and ensure durability, while cement-based grouts are suitable for traditional terrazzo installations.
Another critical factor is the location of the terrazzo; for areas prone to moisture, like bathrooms or kitchens, choose a waterproof grout to prevent mold and mildew growth.
Lastly, ensure the grout selected is compatible with the sealer you plan to use to protect and maintain your terrazzo surface.
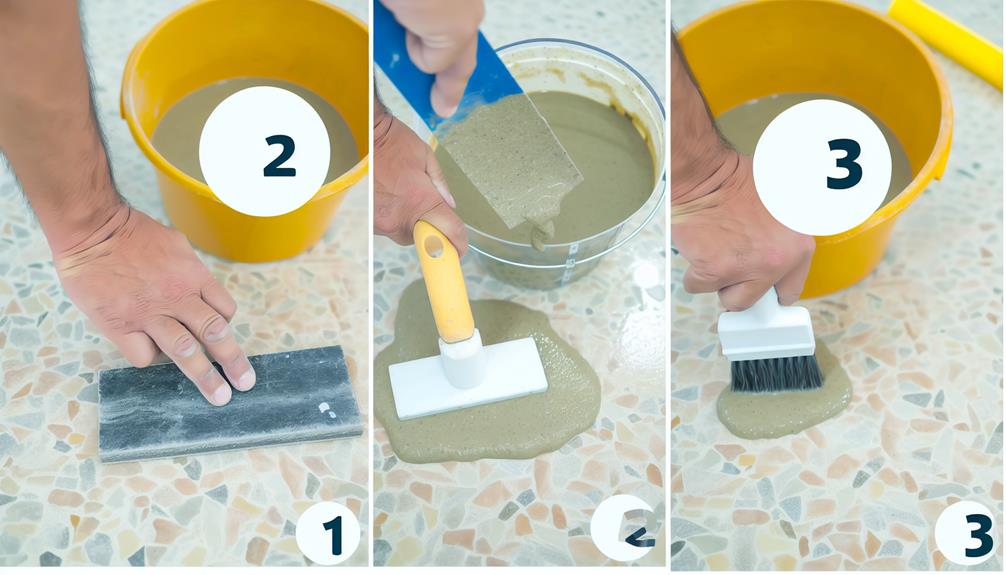
Mixing the Grout
For mixing the grout, start by preparing a clean and sturdy mixing container such as a bucket or a mixing tray.
Ensure that the container is free of any debris that could contaminate the grout mixture. Next, measure out the appropriate amount of grout powder according to the manufacturer's instructions.
It's crucial to follow the recommended water-to-grout ratio for the best results. Slowly add the water to the grout powder while stirring continuously.
Use a margin trowel or a mixing paddle attached to a drill to achieve a smooth and lump-free consistency. Make sure to mix the grout thoroughly to avoid any dry pockets or uneven texture.
Pay attention to the mixture's thickness; it should be similar to a thick peanut butter consistency.
Overly thin grout can lead to shrinkage and cracking, while overly thick grout will be challenging to work with. Once the grout is thoroughly mixed, let it sit for a few minutes to allow any air bubbles to rise to the surface before proceeding to apply it on the terrazzo surface.
Applying the Grout
Ensure that the terrazzo surface is clean and free of any dust or debris before applying the grout.
Begin by pouring the mixed grout onto the terrazzo floor or surface. Use a rubber grout float to spread the grout evenly over the terrazzo.
Hold the float at a 45-degree angle and push the grout into the joints, ensuring they're completely filled. Work in small sections to prevent the grout from drying out before you can finish.
After spreading the grout, hold the float at a 90-degree angle and scrape off excess grout from the surface.
This will leave the grout only in the joints. Allow the grout to set for about 15-30 minutes before cleaning off any haze with a damp sponge.
Be careful not to remove grout from the joints. Let the grout dry for the recommended time before proceeding to the next step of sealing and finishing the terrazzo surface.
Cleaning Excess Grout
After spreading the grout onto the terrazzo surface and ensuring the joints are filled, the next crucial step is cleaning off excess grout to reveal the desired finish.
Begin by allowing the grout to set for about 15-30 minutes, depending on the manufacturer's recommendations. Use a grout float at a 45-degree angle to scrape off excess grout gently. Work diagonally across the tiles to avoid pulling out the grout from the joints.
Next, dampen a grout sponge and wipe diagonally across the tiles to remove any remaining grout residue. Rinse the sponge frequently and change the water as needed to prevent excess grout from smearing across the tiles. Take care not to remove too much grout from the joints during this process.
Lastly, once the grout has dried for about 24 hours, buff the tiles with a clean, dry cloth to remove any haze left behind by the grout. This final step will leave your terrazzo surface looking clean and polished, ready for the next stage of sealing the grout.
Sealing the Grout
To effectively seal the grout on your terrazzo surface, you will need a high-quality grout sealer that is specifically designed for terrazzo tiles. This crucial step helps protect the grout from moisture, stains, and discoloration, ensuring the longevity and beauty of your terrazzo floor. Here are some key points to consider when sealing the grout:
| Step | Description | Tips |
|---|---|---|
| Clean the Surface | Thoroughly clean the terrazzo surface and ensure the grout lines are dry. | Use a gentle cleanser and allow ample drying time. |
| Apply the Sealer | Using a brush or applicator, carefully apply the grout sealer along the lines. | Work in small sections for better coverage. |
| Wipe off Excess | After applying the sealer, wipe off any excess product from the surface. | Use a clean cloth to avoid streaks or residue. |
Final Inspection
Inspecting the terrazzo grouting upon completion is a key step to ensure the quality and durability of your terrazzo surface.
There are some important aspects to consider during the final inspection:
- Grout Consistency: Check that the grout lines are evenly filled and at the same level across the entire surface.
- Color Uniformity: Verify that the grout color is consistent throughout the terrazzo installation.
- Smooth Finish: Run your hand over the grout lines to ensure they're smooth and level with the terrazzo tiles.
- Cleanliness: Wipe down the surface to remove any grout residue or haze, ensuring a clean and polished appearance.
Maintenance Tips
Begin by following these maintenance tips to ensure your terrazzo grouting stays in pristine condition:
Maintenance Tips
To keep your terrazzo grouting looking its best, follow these simple yet effective maintenance tips:
| Maintenance Task | Frequency | Additional Notes |
|---|---|---|
| Regular Cleaning | Weekly | Use a pH-neutral cleaner and a soft mop to avoid damaging grout. |
| Sealing | Every 1-2 years | Apply a penetrating sealer to protect grout from stains and dirt. |
| Avoid Harsh Chemicals | As Needed | Refrain from using acidic or abrasive cleaners that can erode grout. |
Frequently Asked Questions
Can I Use Colored Grout With Terrazzo Tiles?
Absolutely! Using colored grout with terrazzo tiles can add a unique touch to your design. It's crucial to select a high-quality, stain-resistant grout that complements your terrazzo. Follow proper installation steps for best results.
How Long Should I Wait Before Walking on Newly Grouted Terrazzo?
After grouting terrazzo, wait 24-48 hours before walking on it. This allows the grout to fully set and harden. Rushing this step can damage the grout lines. Always follow manufacturer recommendations for specific drying times.
Can I Use a Steam Mop to Clean Grouted Terrazzo Floors?
When cleaning grouted terrazzo floors, it's best to avoid using a steam mop. The heat and moisture can damage the grout over time. Stick to gentle cleaning methods like a pH-neutral cleaner and a soft mop for optimal maintenance.
How Do I Fix Cracks or Chips in the Grout?
To fix cracks or chips in the grout, start by cleaning the area thoroughly. Next, apply a grout repair product using a small tool. Finally, wipe away excess and let it dry completely for a seamless finish.
Is It Possible to Change the Grout Color After It Has Dried?
Yes, you can change the grout color after it has dried. To achieve this, you will need a grout colorant or a sealer that can alter the appearance of the grout. Follow the manufacturer's instructions for the best results.